
Feature Release December 13, 2016
When adding a camera, some settings can be edited while waiting for the add camera process to complete. Name and tags are presented for editing while adding. Clicking “more settings” allows editing the On/Off/Schedule, Time Zone and Notes.
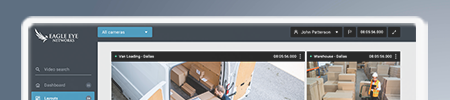
From the Dashboard, click the green “+” next to an available camera. As soon as the “Add Camera” dialogue appears, enter the name and any tags.
There are two choices to eixt the Add Camera dialogue:
- 1. “Save” saves the device names and any tags and then closes the dialogue returning to the dashboard.
- 2. “More Settings” opens additional camera settings.
Camera preview image will appear once the streams are set and accepted between camera and bridge.

“More Settings” that are available
- On/Off/Schedule
- Name
- Login
- Time Zone
- Tags
- Notes
- Information
After the camera is fully initialized, all camera settings panes will appear (Retention, Resolution, etc.). Camera settings can be accessed anytime from the Dashboard by clicking the gear icon.
Other posts that might interest you

Big-bank-level video surveillance — for any size of bank
The qualities that make a particular video surveillance system – and video surveillance itself – attractive to a large bank or credit union are just as valuable to a smaller…
March 5, 2025
Why sensors beyond video should matter for video surveillance
For years, video surveillance has been the most obvious way to document safety and security issues on your premises, whether to spot problems in real time, or at least to…
February 27, 2025

Cloud surveillance and banking: A natural fit
Banks and credit unions are inherently attractive to thieves. Since the invention of consumer banking, they've been the target of armed robberies and elaborate heists. And even if insurance coverage…
February 18, 2025