About Object Counting
For higher accuracy when counting people, use a dedicated camera mounted with a top-down view in which persons remain the same size as they travel through the image. In order to be counted, objects must be tracked across a line. This means the object must be tracked prior to crossing the line and at least 50% of the object must track across the line. Lines must be placed in such a way to allow the object to cross and should not be placed in parallel near the edge of the image. For best practices, place the line as close to the center of the image as possible. This may require re-aiming the camera. A range of object height and width are defined to track the people (or objects) desired.

Example of Camera Settings / Analytics / Line Crossing without Line
Click the yellow plus (+) symbol to add a new line. Adjust the line in the preview window by clicking, holding and dragging. Click an arrow to select the direction that will be used as the main direction for crossing. The selected arrow is indicated by green as well as a little triangle next to the line itself.
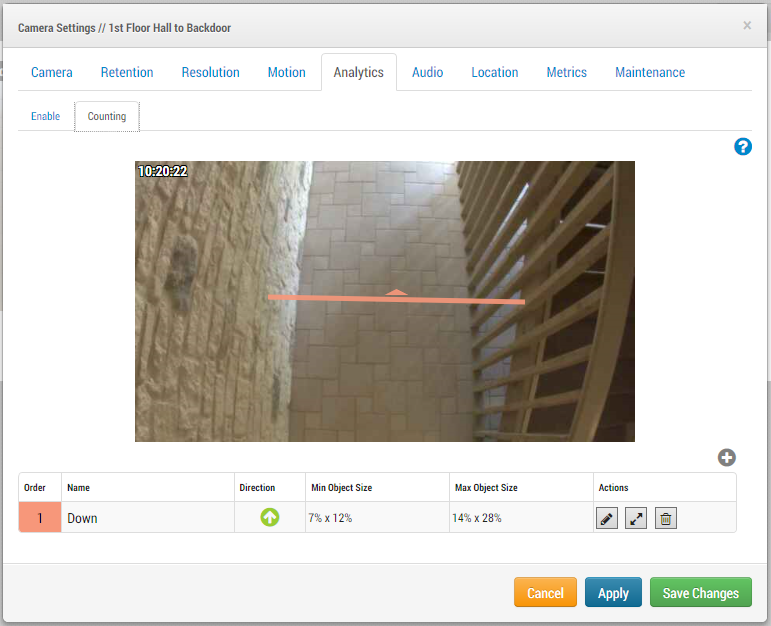
Example of Camera Settings / Analytics/ Counting
Only one line is supported. The yellow plus is not available if a line already exists.
Changing the name, direction, object width and object height
The size of objects to track across the line can be set in order to track specific objects, such as cars or people while ignoring all other objects. Set an object width and height based on the view of the camera and the size of the objects desired for counting. Objects that are recognized will be displayed with green analytics boxes in the preview window. The width and height each have a minimum and maximum setting. For example, if you wish to track a person, estimate the width and the height of a person as a % of the size of the entire image. If uncertain, leave the default settings and then adjust larger or smaller to add or eliminate objects. Review video in the history browser to see objects and when they are counted.
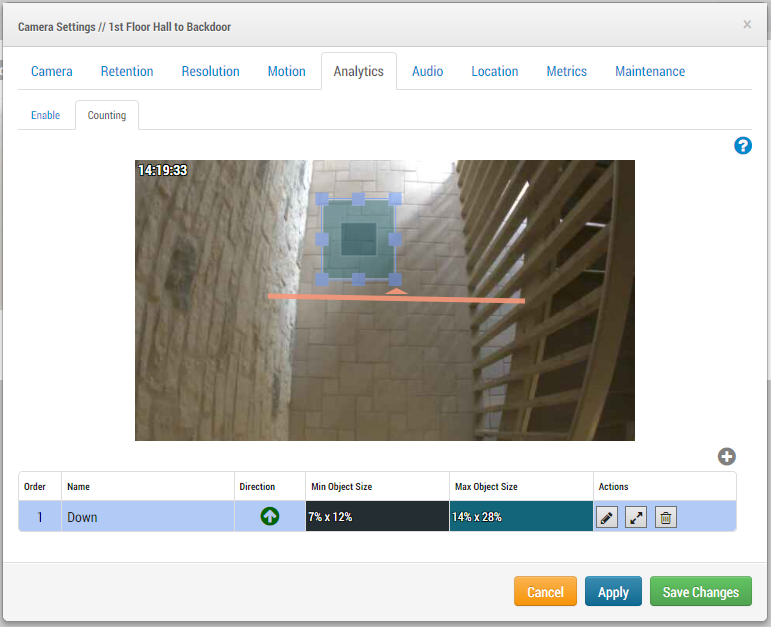
Example of Camera Settings / Analytics/ Counting with Object Size
Direction
Click the arrow to adjust the direction in 90-degree increments. Objects within the width and height settings that cross the line will be counted.
Minimum & Maximum Object Sizes
Click anywhere in the minimum or maximum object size row or click the object size icon to see the min-max object size in the preview window. Set the size in the preview window. Black represents the minimum and teal green represents the maximum object size that the analytic will target. Adjust the minimum and maximum size to track objects whose height are between the minimum and maximum.
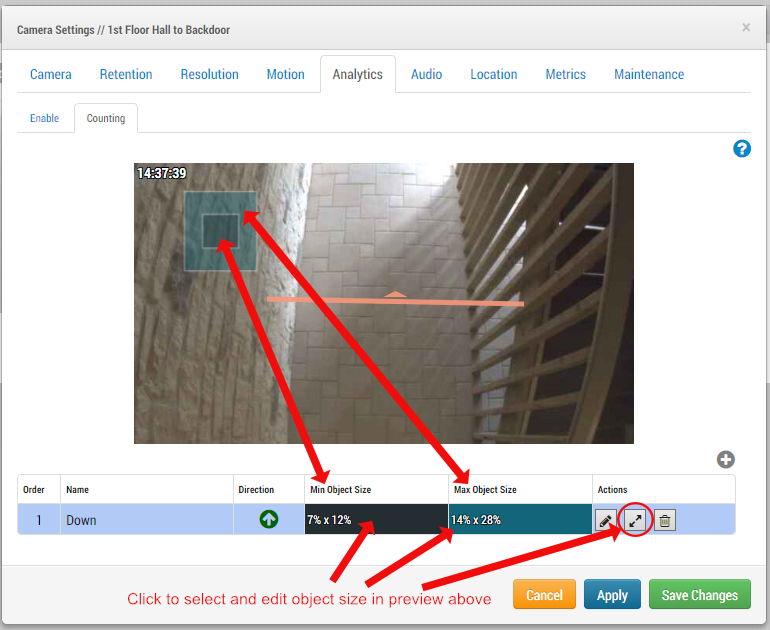
Clickable areas to edit Minimum and Maximum Object Size
Pencil
Click to edit the line in the preview window.
Trash Can
Click to delete the line.
Cancel
Click to ignore any changes since the last changes were saved (or applied) and to exit the Camera Settings dialogue.
Apply
Click to save the changes and view them in the preview window without closing the Camera Settings dialogue.
Save Changes
Click to save the changes and exit the Camera Settings dialogue.
Notes
The main direction across the line, the opposite direction, and the difference between them will be displayed in the top right of video preview and history browser with running totals for the day. The count is reset daily at 2:00 AM in the time zone of the camera. Green Analytics boxes are shown in the history browser around objects that are detected. Dark green lines indicate a count. The count is shown historically by navigation of the timeline.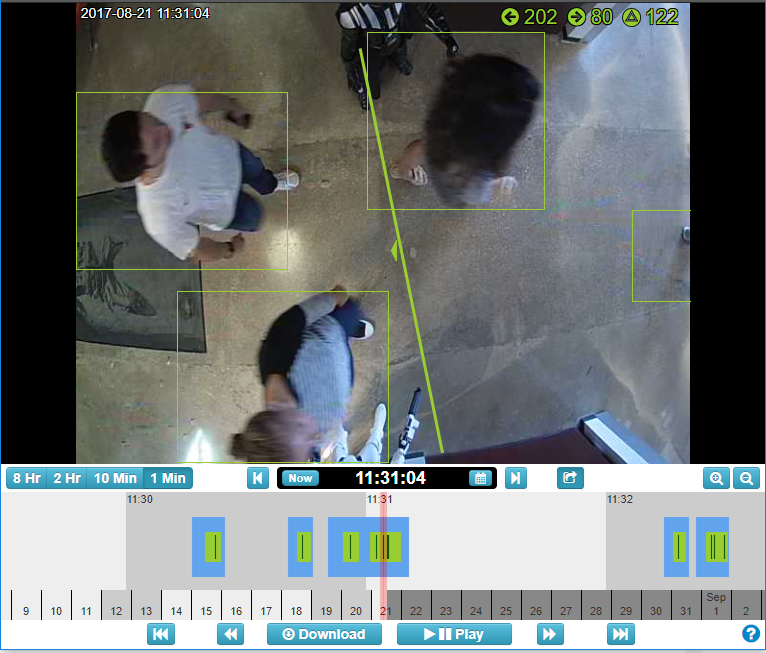
Example of Object Counting Overlay in the History Browser with Counting Markers
Access the analytics graphs by selecting analytics under actions of the camera when viewing preview video or from the dashboard.
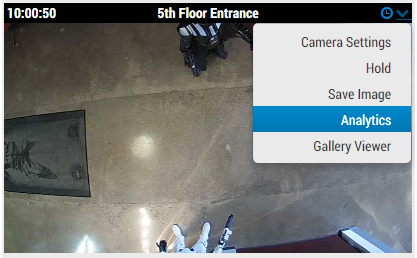
Accessing Graphs from Preview
Example of Counting Graphs – Counting In
Example of Counting Graphs – Counting Out
Example of Counting Graphs – Difference
Learn More about Eagle Eye Analytics
Enabling Analytics
Intrusion Detection
Line Crossing
Enable Analytics on your Eagle Eye Account
+1-512-473-0501
[email protected]
Other posts that might interest you

Bandwidth Recommendations
Executive Summary: We recommend 100kbps per camera for our realtime previews stream. You can adjust the quality on those by raising or lowering the settings but those are safe averages.…
April 17, 2014
Common Support Questions
How do I add a bridge? Each bridge comes with a unique Attach ID. The Attach ID is used to associate that bridge with an account. In order to add…
April 17, 2014
Enabling Axis ONVIF support
Axis makes terrific cameras and as a founding member of the ONVIF standard they are a great compliment to our product. Axis handles security for their cameras uniquely and the…
April 22, 2014


